- telnet
- ftp
- wavconvert
- jpeg
|
|
Applications |
- Tools
|
![[ Top ]](images/uparrow.gif)
|
Ajirc - Internet Relay Chat Client |
AJIRC is the name for two different Internet Relay Chat programs both written
by Jolse Maginnis for WiNGs. Internet Relay Chat (IRC) allows the user to
connect to any of thousands of IRC servers around the world. Each server hosts
chat channels. Many people can join a single channel at the same time, and
see each other and have a conversation. Conversations are in real time, by
sending a sentence at a time, which is immediately received by everyone else
in the channel. IRC is one of the oldest internet protocols, and is still
widely used today because still proves to be an extremely useful way to
communicate with many people at a time. There is a GUI version of AJIRC, as well as a text-based console AJIRC. An
IRC program is usually referred to as the IRC client. The GUI client of course
requires that the GUI be running and that you have a mouse. The client
displays itself in a single window, with two main parts. The text scroll area
on top, plus a single line text input beneath that. There are also buttons
along the bottom of the window for switching between multiple channels.
There is a GUI version of AJIRC, as well as a text-based console AJIRC. An
IRC program is usually referred to as the IRC client. The GUI client of course
requires that the GUI be running and that you have a mouse. The client
displays itself in a single window, with two main parts. The text scroll area
on top, plus a single line text input beneath that. There are also buttons
along the bottom of the window for switching between multiple channels.The first thing an IRC user must do is connect to a server. There are several pre-specified servers in the GUI cient, right click on the main window, and choose servers to see a submenu with more options. Clicking one of them will start AJIRC automatically trying to connect to the selected server. You must be online to connect to an IRC server. After it has connected, you usually choose a nickname for yourself. This name is what other people will see you listed as. Commands are sent to the IRC server by special messages typed into the text input line. Most things you type in will simply be spoken to the channel when you press return, however lines which begin with a frontslash (/) signify to the server that you are trying to send a special command. Some of the commands are as follows: /join #channelname /part #channelname /msg username private message text here /server serveraddress /op username /deop username /nick newnickname These are the basic commands. /join will join a new channel. /part will let leave a channel you previously joined. /msg followed by a username of someone in a channel you are in, followed by some message text will cause that message text to be sent ONLY to the user you specified. This makes it private as no one else in the channel will see what you wrote. /server allows you to specify a specific server, so you can access servers other than the examples in the servers menu. IRC channels allow for certain users to have control over other users. Some who has this control is called the "Operator." Or Op for short. If someone has operator status, they can choose to give it to others. If you manage to get op'ed, you can op and deop other people in the channel. Being an operator is normally a privilege only granted to trustworthy people, and should not be abused. In the GUI client, if you /join several channels, each channel creates a new button at the bottom of the window. Clicking one of the buttons changes the text area and your input to that channel. Channels which you are not focused on will turn their respective button red to let you know when someone has spoken that you weren't able to see. Private messages that people are sending to you will appear in a new button as well. You can quit from IRC by simply clicking the X on the top right of the AJIRC window, however it's best to /part from the channels first. And say good bye to be polite. The console AJIRC client behaves very similarly to the GUI but it may be preferable to use if you do not want to have the GUI running, or if you do not have a mouse. To start the console client, type the following: irc /dev/tcp/irc.server.here:port nickname The "irc.server.here:port" part of that is the IRC server you want to connect to. The console client doesn't have any preconfigured servers. The :port is optional. And finally the nickname is what name you want to use. In the console client, joining multiple channels does not show you visually which channel you are speaking in currently. So you must be careful to make sure you're speaking in the correct one. You join a channel the same way by typing /join channel name. If you are in two channels and you want to switch back and forth you just type /join channelname again. If you are already joined to it, that's ok, it will just switch your focus to that channel. Typing /nick nickname will change your nickname on the fly. To quit from the console AJIRC client, type /quit. 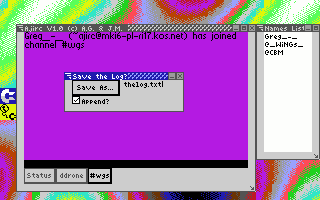 The GUI AJIRC client has a few other advantages over the console version. Not
only does it separate the channels and allow you to switch with tabs, but the
tabs change colour to provide notification of channel state. The channel
currently selected shows a bold tab colour, other channel tab colours are greyed
to make them appear less important. If a message is posted to a channel that
is not currently selected, that channel tab highlights in red. The GUI AJIRC
also has an optional nick list palette window. You can open this or close it,
and resize it or more it whereever you want, it shows the list of nicknames in
the currently selected channel. As you change channels, the nick list
automatically changes to show the nicknames in the selected channel. For
convenience you can change the background "highlight" of the text window. If you
are in several channels, you can set one to be blue and other to be yellow, or
whatever you like, making it easier to identify what channel you have currently
selected. The GUI AJIRC also allows you to save the content of a channel's
chat log as a text file on your computer.
The GUI AJIRC client has a few other advantages over the console version. Not
only does it separate the channels and allow you to switch with tabs, but the
tabs change colour to provide notification of channel state. The channel
currently selected shows a bold tab colour, other channel tab colours are greyed
to make them appear less important. If a message is posted to a channel that
is not currently selected, that channel tab highlights in red. The GUI AJIRC
also has an optional nick list palette window. You can open this or close it,
and resize it or more it whereever you want, it shows the list of nicknames in
the currently selected channel. As you change channels, the nick list
automatically changes to show the nicknames in the selected channel. For
convenience you can change the background "highlight" of the text window. If you
are in several channels, you can set one to be blue and other to be yellow, or
whatever you like, making it easier to identify what channel you have currently
selected. The GUI AJIRC also allows you to save the content of a channel's
chat log as a text file on your computer.IRC is an excellent chat system for meeting in a specific place and really accomplishing something. If the channel becomes too busy because it has too many people or too many messages are being sent back and forth, you can send a private message to a spefic person you want to speak with ask them to join another channel with you. Then you end up being the only too people in that new channel and you can speak for as long as you want with out being interupted. Some popular C64 channels used are, #c-64 #wgs #c64friends But there are thousands of other channels on every topic imaginable. The IRC networks truly are there for you to explore and enjoy. |
![[ Top ]](images/uparrow.gif)
|
Fileman - Feature Packed File Manager |
The Console fileman is a two panel file management system with many other
useful features. It only runs on the 80 Column console, and can be started
by typing "fileman." What immediately comes up are two panels, which lie one
on above the other filling the screen, and a menu of options at the bottom.
The fileman has more options than can fit on the menu bar! So instead the
menu bar lists "(?) help" as one of its options. Pressing the Question Mark
on the keyboard will bring up a display of all the keys and commands that
the fileman understands.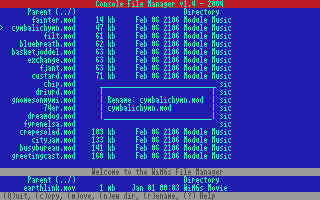 The fileman's primary function is to help you copy, move, rename and delete
files. Each panel allows you to navigate around the various drives connected
to your commodore, their
partitions, and directories. The cursor keys move the pointer up and down the
list of files and directories. Pressing return while the pointer is beside a
directory will move you to inside that directory. When you are in a
subdirectory the top most item you can cursor to is labelled "parent (../)",
pressing return on this will move you to the parent directory of the one you
are in currently. Pressing Control on the keyboard will move the focus from
one panel to the other. You can tell which panel is in focus because the
title bar above it will be red. The title bar of the panel which is not in
focus will be grey.
 To manage files, navigate around your system in one of the panels to find the
files that you want to move or copy, and then press control to switch to the
other panel. Navigate around your system in this panel to find the destination
of where you want the files to go. Press control again to switch back to
the first panel. Pressing the space bar will put a Flag beside the file to
mark it. When you've marked all the files you want to manage, the menu bar
shows the basic commands, "(c)opy, (m)ove, (r)ename" pressing "m" would move
all of the selected files from the panel in focus to the location in the
other panel. pressing "c" would make a duplicate of those files into the
location in the other panel. It's a very easy and visual way to move and
copy files around the system. The fileman is probably the most powerful file
copier and mover available on the C64, because it calls on underlying
strengths of WiNGs to do all the work. When you flag a directory in one
panel and choose to move it to another location, it does exactly what you want!
The fileman moves the directory, but it also moves all the files under that
directory, plus all the directories and all their files and on and on... It
will move the entire branch of the tree with just one key press. It can even
do this across drives or partitions.
To manage files, navigate around your system in one of the panels to find the
files that you want to move or copy, and then press control to switch to the
other panel. Navigate around your system in this panel to find the destination
of where you want the files to go. Press control again to switch back to
the first panel. Pressing the space bar will put a Flag beside the file to
mark it. When you've marked all the files you want to manage, the menu bar
shows the basic commands, "(c)opy, (m)ove, (r)ename" pressing "m" would move
all of the selected files from the panel in focus to the location in the
other panel. pressing "c" would make a duplicate of those files into the
location in the other panel. It's a very easy and visual way to move and
copy files around the system. The fileman is probably the most powerful file
copier and mover available on the C64, because it calls on underlying
strengths of WiNGs to do all the work. When you flag a directory in one
panel and choose to move it to another location, it does exactly what you want!
The fileman moves the directory, but it also moves all the files under that
directory, plus all the directories and all their files and on and on... It
will move the entire branch of the tree with just one key press. It can even
do this across drives or partitions.That is a taste of the fileman's primary use as a great file management tool, but it is much much more than that. The fileman can also work as a media launcher. The fileman has a system of determining what a file is by looking at its extension. If you press return on a file with an extension that it has a corresponding program for, the file will be launched. So for example, if you have a Sid file called "somesong.sid", the fileman recognizes that this is a Sid music file. When you move the cursor to this file and press return, the sid tune is immediately loaded and played. Press the Stop key to stop the sid from playing and to regain control of the fileman. If you have a file that ends in .txt, pressing return on it will open it in NED to be read or edited. The fileman can understand and play many file types, including .wav's, .xm's, .mod's .s3m's, .sid's, .dat's, .txt's and .htm's or .html's, .zip's, and .gz's With .wav files, the fileman goes even further by allowing you to add new .wav files to an active playlist of WavStream, a streaming wav player, and separate application. The file types that the fileman understands can be expanded by modifying its filetypes.xml file. 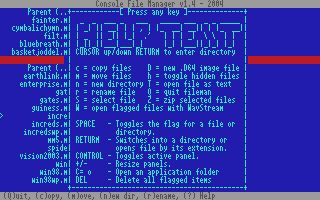 Fileman's capabilities do not end here. With .d64 disk image files, the fileman excels!
If you press return on a .d64 file, the fileman interprets the contents of the
.d64 as a new directory and allows you to navigate into it to view, browse or
even edit the files inside. You can open a .txt file that is embedded in a
.d64 file, edit it and save the changes directly back to the .d64 file, without
ever having to extract any of the contents first. The fileman also allows
you to create new blank .d64 files which you can then open up and add files to.
To add files to a .d64 simply press return on the .d64 to navigate into it, then
press control to switch panels. Navigate to a different part of your system
with this panel and select a file and copy it. It will be copied directly into
the .d64 image file.
 The fileman also has file compression and decompression completely licked. Want to make a new zip archive of several files on your harddrive? Just flag the files that you want to have in the archive and press "Z" (this and the other commands are listed on the built in help screen), and a dialog box will ask you if you are sure you want to do this, if you agree, it asks you for a name for the .zip archive. And that's all there is to it. If on the other hand you already have a .zip or .gz file that you want to expand, just press return on that file and a dialog will ask you if you want to expand the archive, if you agree, the files are extracted right there in place. A few final words about this excellent utility. Files listed in the panels can be sorted alphabetically by filename, by filesize or by filetype, making it much easier to find files by grouping them together according to size, name or type. To change the sort order of a panel, press 1,2, or 3 on the keyboard. Each panel can be sorted independently. The sizes of the panels are not fixed. You may move the divider line up and down, making one of the panels bigger and the other smaller, by pressing the Plus and Minus (+/-) keys. When you quit the fileman, it remembers the last sizes, and the last locations, and the sort orders of both panels. Which makes it very convenient to pick up where you last left off. |
![[ Top ]](images/uparrow.gif)
|
Mail - Full Featured Pop3/SMTP Email Client |
 Mail version 2 is a huge step up from version 1 which came about a
year earlier. Mail v2 is the first publicly available email client
for the Commodore64 that allows both sending and receiving of email
using the industry standard POP3 and SMTP protocols.
Mail version 2 is a huge step up from version 1 which came about a
year earlier. Mail v2 is the first publicly available email client
for the Commodore64 that allows both sending and receiving of email
using the industry standard POP3 and SMTP protocols.Mail v2 can be configured to access and manage a virtually unlimited number of email accounts. Connecting to an account it is able to retrieve and download new mail and attachments which are then stored on a local disk or harddrive. Mail v2 provides a simple and intuitive interface for managing accounts and account preferences, browsing, viewing and managing emails and attachments, as well as replying, saving drafts and composing new messages. 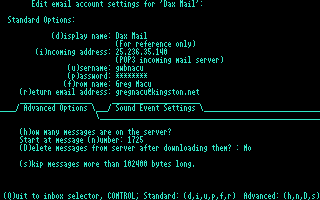 Mail v2 gives you features you'd never expect to find in an
application as small as 90 kilobytes. Some of these features are listed below.
Mail v2 gives you features you'd never expect to find in an
application as small as 90 kilobytes. Some of these features are listed below.Mail v2 is fully menu driven, and opens up with an inbox selection utility. From here you can add edit or delete a incoming account. Each incoming account allows a corresponding sending account to be configured. The minimum information required to setup a new account is a Username, a Password, and a POP3 server address.
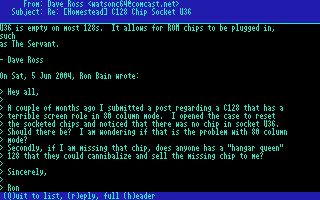 Selecting which inbox you want to use is as simple as using the cursor keys
to move the selection arrow up and down the list of configured accounts,
then pressing RETURN to open the selected item.
Selecting which inbox you want to use is as simple as using the cursor keys
to move the selection arrow up and down the list of configured accounts,
then pressing RETURN to open the selected item.After opening an inbox you are presented with a new screen and a new set of menu options which present themselves along the bottom of the screen. From here you may download new mail for this account, view a message previously downloaded, or compose a new message for sending. Using the cursor keys to move the selection arrow up or down the paged list of available messages, pressing RETURN allows you to open and read the message content. Messages encoded as HTML, Printed-Quotable or plain text, the three most common message formats, are supported and displayed as a readonly message which can be scrolled up and down, line by line, for the most comfortable read. The message header defaults to a condensed size to provide the most amount of viewing area for the message body. But with a single keystroke the header can be expanded or contracted again, to reveal more detailed information about the message, including priority, date received, from address and subject. 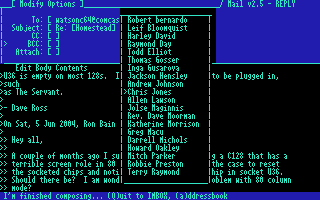 While viewing a message, the menu bar at the bottom of the screen tells you
that you can reply to this message by pressing the letter r. Replying to a
message, and composing a new message are very similar. Replying is just like
composing new, but all the fields are filled in for you. The body of the
message is added to your reply as quoted text. The subject will have "re:"
prepended to it, but only if "re:" is not already there. And the reply
is automatically addressed to the person who sent you the message being
replied to.
While viewing a message, the menu bar at the bottom of the screen tells you
that you can reply to this message by pressing the letter r. Replying to a
message, and composing a new message are very similar. Replying is just like
composing new, but all the fields are filled in for you. The body of the
message is added to your reply as quoted text. The subject will have "re:"
prepended to it, but only if "re:" is not already there. And the reply
is automatically addressed to the person who sent you the message being
replied to.Composing a new message provides the same interface, but all the fields begin blank. Using the cursor keys the selection arrow moves between the available fields. Pressing RETURN beside a field allows you to edit the field's contents. If you've made a mistake in the field you've selected press the backarrow at the top left of the keyboard. The available fields are, To, Subject, CC, BCC, Attach, and Edit the body contents. With the selection arrow beside To, CC, or BCC, pressing the letter a on the keyboard will popup a selection box with all of the contacts in your address book. Use the cursor keys to move the selection arrow up and down the scrollable list. Press RETURN to confirm the selection. Press the backarrow to close the address book popup without making a selection. Pressing RETURN on the Attachment field will bring up the fileman. Selecting a file with the fileman will bring you back to mail and the path to the selected file will be inserted into your message for you. To remove CCs, BCCs, or attachments from your message, simply press the delete key on the keyboard with the selection arrow beside the item you want to remove. Pressing RETURN with the selection arrow beside Edit body contents opens the text editor 'Ned' with your message for you to edit or compose. When your message is complete, or when you are ready to move on, select quit to inbox from the menu options. A dialog box will prompt you to either deliver the message now, save as a draft to work on or send later, or abandon the message without saving. You must be connected to the internet at the time you try to send the message. But you can read previously downloaded mail, and work on a reply which you save as a draft, without needing to be connected to the internet. 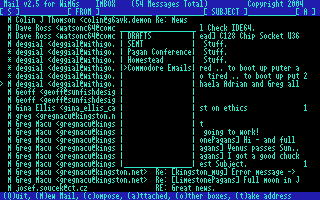 All messages saved as drafts are stored in the drafts box, and all sent
messages are saved in the sent mail box. From the inbox you can press the
letter o on the keyboard presents a dialog box which allows you to switch
to either the drafts or sent box. Pressing RETURN on a message in the
drafts box reopens it to allow you continue editing it. Pressing RETURN
on a message in the sent box opens a duplicate copy of the message previously
sent and allows you to modify it and send it again.
All messages saved as drafts are stored in the drafts box, and all sent
messages are saved in the sent mail box. From the inbox you can press the
letter o on the keyboard presents a dialog box which allows you to switch
to either the drafts or sent box. Pressing RETURN on a message in the
drafts box reopens it to allow you continue editing it. Pressing RETURN
on a message in the sent box opens a duplicate copy of the message previously
sent and allows you to modify it and send it again.In any of the boxes, inbox, drafts or sent mail, you may press the delete key on the keyboard to flag a message for deletion. Pressing delete again on a message already flagged will unflag it. When you leave that mail box all messages in it flagged for deletion will be deleted permenantly. Mail v2 is a nice email client with a fair number of useful and modern features. A very nice compliment to the WiNGs Operating System. |
![[ Top ]](images/uparrow.gif)
|
MovieTools - Full Motion Video/Audio Movies |
A mindblowing first on the Commodore 64, Modernity Grp. is proud to
present Full Motion Video movie player and conversion tools for WiNGs.
After 6 Months in development, MovieTools v1.1 goes where no other
Movie/Animation player for the Commodore 64 has ever gone before, bringing
media playback for Commodore users into the 21st century. 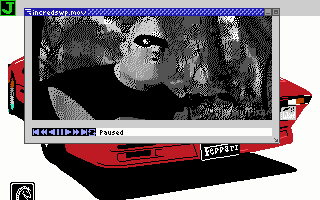 MovieTools is a collection of 4 distinct programs, a frame converter,
movie file composer, a v1.0 (beta) to v1.1 file upgrade utility, and
the player. MovieTools movie files
are a custom file format which caters specifically to the Commodore 64
and its VicII video chip. A movie file consists of a header, describing
the content and specifications of the movie data, followed by compressed
preview video frames, uncompressed digital audio in PCM Wave format,
and finally the main compressed set of video frames.
MovieTools is a collection of 4 distinct programs, a frame converter,
movie file composer, a v1.0 (beta) to v1.1 file upgrade utility, and
the player. MovieTools movie files
are a custom file format which caters specifically to the Commodore 64
and its VicII video chip. A movie file consists of a header, describing
the content and specifications of the movie data, followed by compressed
preview video frames, uncompressed digital audio in PCM Wave format,
and finally the main compressed set of video frames.Each movie file is self contained and self describing, allowing for complete flexibility in specifications on a per movie basis. The header describes Width and Height of image resolution in pixels, frame rate as frames per second, total number of frames, sample rate of audio, Number of preview frames, and frame rate of preview. Audio and preview frames are optional. 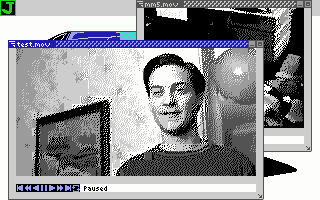 The movie player gives the user complete control over the content playback.
With a set of control buttons. A movie can be paused and resumed, played
forward, played in reverse, played forward in highspeed and played in reverse
in highspeed. There are also buttons to skip immediately to the beginning
or instantly to the end of the movie. There is also a loop button. When
loop is on, a movie playing forward when it hits the end will jump back to
the beginning and continue playing. A movie playing in reverse when it hits
the beginning will jump to the end and continue playing in reverse.
The movie player gives the user complete control over the content playback.
With a set of control buttons. A movie can be paused and resumed, played
forward, played in reverse, played forward in highspeed and played in reverse
in highspeed. There are also buttons to skip immediately to the beginning
or instantly to the end of the movie. There is also a loop button. When
loop is on, a movie playing forward when it hits the end will jump back to
the beginning and continue playing. A movie playing in reverse when it hits
the beginning will jump to the end and continue playing in reverse.The preview frames allow the creator of the movie to set up a series of images as a short animation. The preview is loaded in first, and the animation loops while the audio and the main movie frames are being buffered into memory. This gives the user something to watch while he waits, but could also be used as a spash screen advertisement for any group who convert or create movies and make them available for other Commodore users. One of the most important and compelling qualities of MovieTools for WiNGs is the ability to convert movie files over from PC/Mac movie formats. MovieTools is capabable of taking a series of JPEG frames and an audio file and converting them and composing them into a dithered, hires, compressed bitmap movie. The movie file, once created can then be distributed as a single file for other Commodore users to watch and enjoy. With access to an enourmous volume of PC/Mac movie files, our supply of Commodore movies can always be modern and up to date. 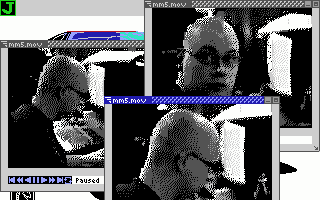 Converting movies from PC/Mac formats first requires exporting the movie
from Quicktime Pro. This is a standard feature of Quicktime Pro, and the
conversion process to the Commodore format did not require even a single
keystroke of custom programming on any computer platform other than the
C64. A movie is exported once as a "Jpeg sequence," and then again as
"Wave Audio." The Jpegs and wave file can then be zipped and transfered to
the C64 whichever way is most suitable to do so. From there, frameconverter
and moviecomposer for WiNGs do the rest. And that's all there is to it.
Movies for the C64.
Converting movies from PC/Mac formats first requires exporting the movie
from Quicktime Pro. This is a standard feature of Quicktime Pro, and the
conversion process to the Commodore format did not require even a single
keystroke of custom programming on any computer platform other than the
C64. A movie is exported once as a "Jpeg sequence," and then again as
"Wave Audio." The Jpegs and wave file can then be zipped and transfered to
the C64 whichever way is most suitable to do so. From there, frameconverter
and moviecomposer for WiNGs do the rest. And that's all there is to it.
Movies for the C64.In the screenshots above, the first is a shot from the trailer of the upcoming Pixar film, "The Incredibles." The second is a shot from the trailer of "Spiderman 2," and the third is a demonstration of a single movie file being played at three different rates in three different windows simultaneously. The movie was taken with a camcorder at the Euro C= Party MM5. MovieTools is packaged in the current WiNGs distribution available right now from the Download & Install section of WiNGs.webhop.org. Enjoy. |
![[ Top ]](images/uparrow.gif)
|
Ned - Quick & Simple ASCII Text Editor |
Ned is a very simple, "four function" text editor. For WiNGs it is
a case example of the wealth of programming designed for other
computer platforms that can be used on the Commodore 64. Ned was
written in C for use on MS-DOS. And was ported to the C64 by Jolz
Maginnis. Because it was written in standard C the port was an easy
process, and in an extremely short period of time we have a quite
powerful ASCII text editor available for use in WiNGs.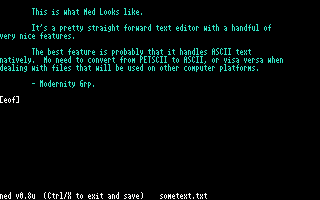 Ned runs in either the 40 or 80 column console modes and is started
by typing "ned" followed by a filename you wish to open. If the
filename specified does not exist a new file with that name will be
created. Ned can be used after only knowing one command! That is that
to exit and save you hold the commodore key and press x on the
keyboard. However, for more advanced functionality, Ned has a lot
of commands available, which I will list here.
Ned runs in either the 40 or 80 column console modes and is started
by typing "ned" followed by a filename you wish to open. If the
filename specified does not exist a new file with that name will be
created. Ned can be used after only knowing one command! That is that
to exit and save you hold the commodore key and press x on the
keyboard. However, for more advanced functionality, Ned has a lot
of commands available, which I will list here.Every command in Ned is issued by holding the Commodore Key down while pressing the key which represents the command you want.
Ned is a the text editor which is used internally by Mail v2 to edit email messages. All of the above commands therefore are useable when you are writing email with Mail v2. |
||||||||||||||||||||||||||||||||||||||||||||||||
![[ Top ]](images/uparrow.gif)
|
SpiffyPaint - Revolutionary Graphic Editor |
|
More Details to Come Soon! In Brief, SpiffyPaint was first demonstrated at the World of Commodore Expo, 2004, in Toronto. SpiffyPaint is a first-of-its-kind graphic editor, painting/drawing program for WiNGs and the Commodore64. SpiffyPaint documents have a user definable canvas size, multiple independent stackable and reorderable layers, masking, transparency, non-destructive grid lines, 32 patterns, multiple movable hideable tool palettes, virtually unlimited undo and redo capability, as well as a host of drawing tools each with their own custom palette of options, such as constrain, center, ghost, opaque, and fill. Here are some screenshots of the program in its current state of development. SpiffyPaint is not yet available to the public as it is still in an alpha stage.      |
![[ Top ]](images/uparrow.gif)
|
Telnet - Two way remote control |
|
Telnet is an internet protocol that has been around for years, and
finally we can make full use of it on our Commodore64 computers. WiNGs has a telnet client which allows you to log into internet BBS's, shell accounts, and other computers and directly control that machine. This is just like having a dial up shell account, only the connection is made through the internet not just a direct modem to modem call. Your Commodore can be connected to the internet in any of a number of ways, including, dialup modem, null modem, or ethernet. The telnet client then allows you to go to any telnet address in the world. When your Commodore connects to another computer on the internet the remote computer must be running a telnet server. The telnet server receives key presses through the internet from your telnet client, then acts upon the key presses and sends you the results back, as text. The WiNGs telnet client isn't the only one available on the Commodore, but WiNGs telnet capabilities don't end with a simple client. WiNGs also has a fully implemented, multi-threaded telnet server. By running the WiNGs telnet server on your Commodore, your Commodore becomes attached to the internet in a way it never has been before. From outside, actually from anywhere in the world, through the internet, you can telnet from another computer INTO your commodore, and control it remotely. You can open files, and work on them, you can run applications like Mail or Fileman and use them. The Applications are running on your Commodore's SuperCPU, but your Commodore is feeding the visual output, out and across the internet. The practicality of this phenomenal power is only barely comprehendable. With Ethernet adaptors and broadband, 24 hour a day, internet connections now available to our Commodore computers, we have the option to leave the house in the morning with our computer on and running. And are able to access it from abroad just as though we were sitting in front of our own desk at home. All of this is only useful and possible because of WiNGs' ability to multitask. On a non-multitasking system, running the internet connection, and the telnet server would be all it was capable of. But since WiNGs was designed to run many programs at the same time, everything just falls into place. WiNGs multitasking is so profound, several people, from different locations can log in, and interact with your Commodore simultaneously! Of course... they have to know your password. WiNGs provides you with a Graphical Control Panel, which makes it a snap to check if the telnet server is running, to start it or stop it, and to change the login password. Technical Notes:
|